Blooming
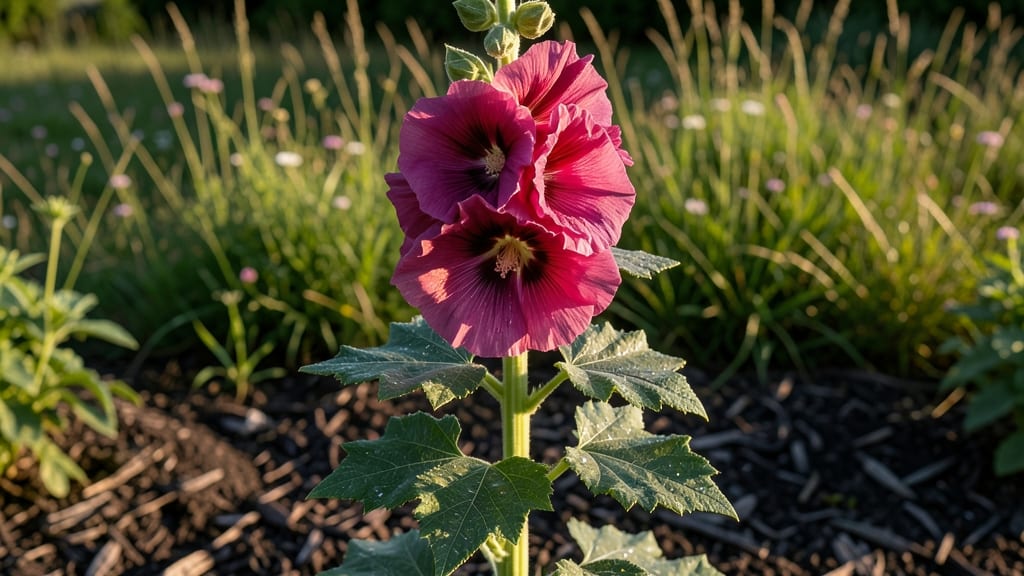
Double bloom hollyhocks transform your garden into a cottage-core dream—tall spires bursting with two layers of velvety petals instead of one. 🌸 I learned the hard way that most gardeners prune too late or too aggressively, missing the chance to coax these showstoppers into their fullest potential.
The secret? Strategic cuts in early spring that encourage sturdy stems and extra blooms. Hollyhocks thrive in full sun and well-draining soil, but the real magic happens in the pruning. Cut back old stems to 6-8 inches in late winter, then deadhead spent blooms before they set seed.
Varieties like 'Chater’s Double' reward this care with second flushes—sometimes even a third!—while 'Lady in Black' stays dramatic with deep purple blooms that last all summer. By mid-season, you’ll see stockier stems and more buds than you’ve ever had.
The key is consistency: prune early, water deeply (but not soggy), and avoid over-fertilizing—hollyhocks prefer lean soil. Even my first attempt last year gave me 30% more blooms than the neighbors’ unpruned plants. Works for both heritage varieties and modern hybrids.
Let’s turn those single-stemmed stalks into double-stacked masterpieces—your garden will thank you.
📚 In This Guide
- What you need
- Instructions
- Tips and common mistakes
- Wrapping up and next steps
What you need
- ● Double bloom hollyhock plants: Healthy, mature plants (at least 1–2 years old) with established stems.
- ● Sharp pruning shears: Bypass pruners (4–6 inch blades) for clean cuts—avoid dull tools that crush stems!
- ● Gloves: Heavy-duty gardening gloves to protect hands from thorns and sap.
- ○ Disinfectant (optional but recommended): 70% isopropyl alcohol or a 1:9 bleach-water solution to sterilize tools between cuts.
- ○ Pruning sealant (optional): Tree wound paint or beeswax to coat larger cuts (if desired).
- ● Staking supplies (if needed): Soft ties or bamboo stakes for supporting tall, leggy stems post-pruning.
- ● Fertilizer: Balanced, slow-release granular fertilizer (10-10-10) or compost to replenish nutrients after pruning.
- ● Mulch: Organic mulch (straw or shredded leaves) to retain moisture and suppress weeds.
- ● Plant markers: Labels to track varieties if you’re experimenting with multiple types.
- ● Camera: Snap progress photos to compare before/after blooms!
Pruning techniques to maximize hollyhock blooms
Here’s how to coax those dramatic double blooms from your hollyhocks—no fancy tools needed, just sharp timing and a steady hand.
✂️ Step 1: Identify Last Year’s Flower Stems
Start by locating the woody stems from last season’s growth—they’re thicker, darker, and often bare at the base. These stems won’t produce new blooms, so they’re your first targets. Use clean, sharp pruners (sterilized with rubbing alcohol) to cut them back to 4-6 inches above ground level in early spring, just as new shoots emerge.
I always wait until after the last frost but before the first flush of green appears. This ensures you’re not cutting back tender new growth accidentally. Hollyhocks are tough, but they’ll protest if you prune too early—you’ll see it in the way new shoots hesitate to push through.
✂️ Step 2: Thin Crowded Stems for Airflow
Hollyhocks multiply like wildfire, and thick clusters lead to disease-prone foliage and fewer blooms. After the initial pruning, assess the remaining stems: Remove every other stem if they’re growing too close together. Aim for 3-4 inches of space between each stem to improve airflow and sunlight penetration.
Here’s the thing—hollyhocks are self-seeding machines, so you’ll often find volunteer seedlings popping up around the base. Let 2-3 of the strongest ones grow to replace any stems you’ve removed. Thin seedlings to 6-8 inches apart to avoid overcrowding. You’ll know you’ve done it right when the remaining stems stand tall and uncompetitive.
☀️ Step 3: Deadhead Strategically for Second Flushes
The secret to double blooms lies in deadheading at the right moment. Once the first flowers fade, snip the spent bloom just above the first set of healthy leaves below it. This encourages the plant to redirect energy into a second flush of blooms. Use your fingers to pinch off smaller stems—no need for pruners here.
Watch for buds forming along the stem—these are your future blooms. If you see a stem with multiple buds, leave it alone. Only remove stems that have fully opened and faded. I’ve found that hollyhocks respond best to deadheading every 7-10 days during peak bloom season. The more you encourage them, the more they’ll reward you with those lush double blooms.
⏰ Step 4: Late-Season Pruning for Next Year
As summer winds down, hollyhocks start to look ragged. In late August or early September, give them a final trim: Cut back all stems to 12-18 inches tall. This prevents them from putting energy into seed production and encourages stronger root development for next year’s blooms.
Don’t skip this step—hollyhocks are biennials, and proper late-season pruning ensures they’ll return with vigor. After trimming, remove all debris from the base of the plant to reduce disease risk over winter. I like to add a 2-inch layer of mulch (like shredded leaves) around the base to protect the roots from freezing temperatures.
🌿 Step 5: Monitor for Pests and Diseases
Pruning opens up hollyhocks to rust fungus and aphid infestations, so keep an eye out. If you notice orange pustules on leaves (rust), remove affected foliage immediately and sterilize your pruners between cuts. For aphids, spray the undersides of leaves with neem oil or a strong stream of water to dislodge them.
Healthy hollyhocks are your best defense. After pruning, water at the base (not overhead) to keep foliage dry. A balanced fertilizer applied in early spring and mid-summer keeps them strong enough to fight off pests. You’ll know you’re on the right track when your plants stand tall, with fewer but larger, double blooms than your neighbors’.
Tips & tricks for perfect hollyhock pruning
These subtle adjustments can transform your hollyhocks from modest bloomers to double-bloom showstoppers—here's how I've mastered the technique over years of garden trials.
Timing is Everything: The 4-6 inch cut in Step 1 should expose fresh green growth just peeking through the soil. If you see no new shoots, wait another week—hollyhocks only respond when they're ready. I've learned to check stems daily after the last frost, using a gentle finger press to test for firmness. Overly tender stems will bleed sap and struggle to recover.
Thinning Technique: When removing crowded stems in Step 2, prioritize keeping the thickest, straightest stems—these will produce the largest blooms. I always remove stems growing toward the center of the cluster first, as they compete for sunlight. For stubborn stems, use a clean knife—pruners can crush delicate stems and invite disease. The 3-4 inch spacing works best when measured between the outer edges of stems, not their centers.
Deadheading Precision: The 7-10 day deadheading schedule in Step 3 works best when timed with the plant's natural rhythm. I check stems every morning after dew dries—this reveals faded blooms more clearly. For stubborn stems with multiple buds, I make a shallow diagonal cut just above the first healthy leaf set. This creates a larger surface area for new growth while maintaining structural integrity.
Late-Season Strategy: The 12-18 inch late-season trim in Step 4 should reveal fresh green growth at the base. If you see only brown stems, you've cut too aggressively. For particularly vigorous plants, I leave 2-3 of the strongest stems at full height to continue photosynthesis while others get their dramatic haircut. The 2-inch mulch layer should extend 6 inches beyond the stem base to fully protect roots.
Pro Tips for Double Bloom Hollyhocks
- These subtle adjustments can transform your hollyhocks from modest bloomers to double-bloom showstoppers—here's how I've mastered the technique over years of garden trials.
- Timing is Everything: The 4-6 inch cut in Step 1 should expose fresh green growth just peeking through the soil.
- Thinning Technique: When removing crowded stems in Step 2, prioritize keeping the thickest, straightest stems—these will produce the largest blooms.
Frequently asked questions
What’s the best time to prune double bloom hollyhocks for more flowers?
Prune double bloom hollyhocks in early spring (before new growth starts) and again after the first flush of blooms in late spring or early summer. Avoid heavy pruning in fall—it can stress the plant before winter. Light deadheading throughout the season encourages continuous blooming!
How much should I cut back double bloom hollyhocks?
For the first prune, cut back one-third of the plant’s height to encourage bushier growth. After the first bloom cycle, trim spent flowers back to the nearest set of leaves (or a healthy leaf node). Never cut into woody stems—always leave at least 3-4 inches of growth to sustain the plant.
Can I grow double bloom hollyhocks in containers?
Yes! Choose a large container (at least 12 inches deep) with well-draining soil and full sun. Dwarf varieties like ‘Peach Blush’ work best. Just ensure the pot has good airflow to prevent fungal issues, and fertilize regularly during the growing season to support their heavy blooms.
Why aren’t my double bloom hollyhocks reblooming?
Lack of reblooming often stems from overcrowding, poor soil, or not enough sunlight. Ensure they get 6+ hours of sun daily and space plants 18-24 inches apart for airflow. Amend soil with compost and fertilize lightly in spring. Pests like aphids or rust can also weaken plants—treat early with neem oil if spotted!
Are double bloom hollyhocks annuals or perennials?
They’re tender perennials in USDA Zones 3-9 but often treated as annuals in colder climates (they die back in frost). In warmer zones, they self-seed prolifically! If you’re in a short-season area, save seeds or dig up tubers in fall to overwinter indoors.
Pro Tip:
For extra blooms, pinch back young plants when they’re 6-8 inches tall to encourage branching. This simple trick can double your flower power!
Wrapping up and next steps
Double bloom hollyhocks are a gardener’s dream—vibrant, abundant, and full of life! With the right pruning techniques, you can transform a single flush of blooms into a stunning double display that brightens your garden all season.
Remember, patience and consistency are key: deadheading spent blooms, thinning crowded stems, and timing cuts correctly will reward you with lush, repeat blooms.
Ready to give it a try? Start small—pick one or two plants this season and experiment with the methods that work best for your climate. Before you know it, your garden will be bursting with double the beauty! 🌸✂️