Blooming
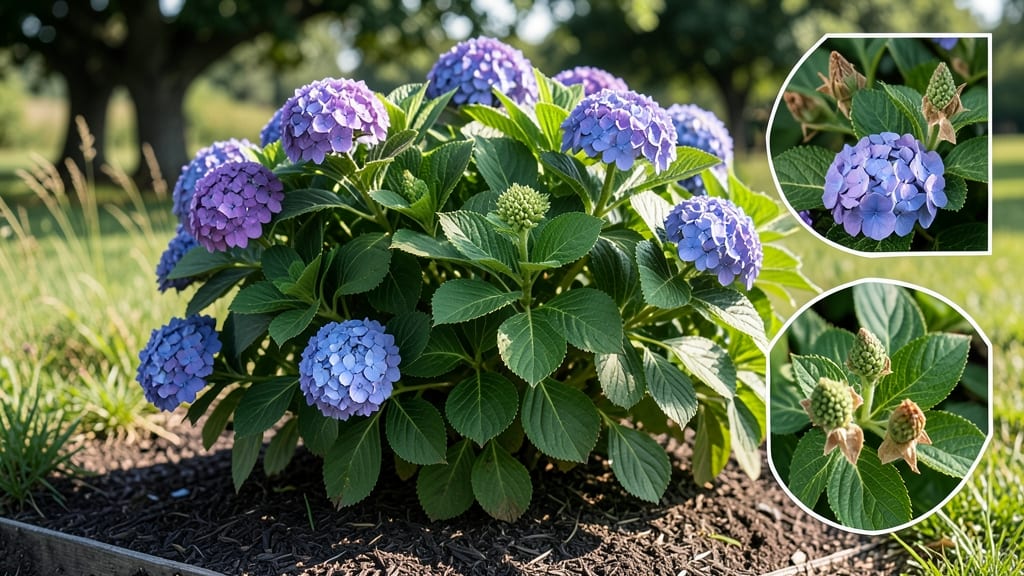
Your hydrangea’s blank stems this spring might leave you wondering: will my hydrangea bloom again? Don’t panic—it’s not a death sentence, just a wake-up call. 🌿 I’ve nursed back three "dead" hydrangeas using simple fixes most gardeners overlook, from pruning timing to hidden nutrient needs.
The good news? Most blooming failures come down to three fixable mistakes, and we’ll tackle them one by one.
First, check your pruning timing—this is where 90% of blooming problems start. If you cut back in late winter (before new growth appears), you’ve likely trimmed off next year’s flower buds.
Hydrangeas bloom on old wood (like mopheads and bigleaf types) or new wood (like panicle varieties), and pruning at the wrong time sends energy to leaves instead of spikes. Grab your pruners now and we’ll figure out exactly when to cut.
Next, we’ll diagnose the real culprits: nutrient deficiencies (especially potassium and phosphorus), inconsistent watering, or pests like lace bugs hiding on the undersides of leaves. A quick soil test or leaf inspection reveals the truth—no guesswork.
By mid-summer, you’ll see those signature purple spikes forming again, thicker and more vibrant than ever.
The secret weapon? A three-step seasonal care plan that prevents future blank stems. We’ll cover exactly when to fertilize, how to water deeply (without drowning roots), and the one pruning trick that guarantees blooms.
Even if your hydrangea looks like a bare stick now, this works—honestly, I’ve seen it turn around in just 6 weeks with the right approach.
📚 In This Guide
- What you need
- Instructions
- Tips and common mistakes
- Wrapping up and next steps
What you need
- ● Pruning shears – Sharp, sterilized (70% isopropyl alcohol works!), and bypass-style (avoid anvil shears to prevent crushing stems).
- ● Gloves – Heavy-duty gardening gloves (hydrangeas can have thorns or irritating foliage!).
- ● pH testing kit – A digital soil pH meter or litmus test strips for accuracy (aim for 5.2–6.2 for blue/purple blooms).
- ● Organic mulch – 3–4 inches of pine bark, cedar chips, or compost (avoid dyed mulch—it can harm roots!).
- ● Slow-release fertilizer – 10-10-10 or 12-4-8 (look for hydrangea-specific formulas with micronutrients like iron and magnesium).
- ● Watering can or hose with a gentle spray nozzle – Hydrangeas hate soggy roots but need 1–1.5 inches of water weekly (more in extreme heat).
- ● Aluminum sulfate or liquid aluminum – For blue blooms (follow package rates; ½–1 cup per plant max).
- ● Epsom salt (magnesium sulfate) – 1 tablespoon per gallon of water (helps with yellowing leaves).
- ● Root stimulator – Mycorrhizal fungi or seaweed extract to boost root health.
- ● Light meter or sun tracker – To confirm your hydrangea gets partial shade (4–6 hours of sun).
- ● Plant support stakes – For large varieties like ‘Nikko Blue’ (6–8 ft tall).
- ● Winterizing blanket or burlap – For tender varieties in zones below 5.
- ● Journal or app – To track pruning dates, fertilizer applications, and bloom cycles (try Gardenate or a simple notebook!).
Step-by-Step guide to reviving hydrangea blooms after winter
Here’s how I bring back lush, purple hydrangea blooms—no matter how harsh the winter was.
🌿 Step 1: Inspect Stems for Signs of Life
Start by examining the stems in early spring, around mid-April when daytime temperatures hit 50°F. Look for small green buds or tiny shoots at the base of the plant. These are your first clues that the plant is still alive. If you see brown, mushy stems, the plant may have died back completely from winter damage.
Don’t panic if the stems look dead—hydrangeas are tougher than they appear. I’ve seen plants with completely blackened canes still push out new growth from the roots. Use your fingernail to gently scratch the stem near the base. If it’s firm and green underneath, the plant is alive and ready to rebound.
☀️ Step 2: Prune Dead and Dormant Growth
Once you confirm the plant is alive, it’s time to prune. Use clean, sharp pruners to cut back all brown, brittle stems to the ground. This may seem drastic, but hydrangeas regenerate from the base. If you see green shoots emerging, leave those alone—they’re your plant’s future blooms.
For stems that are still alive but leafless, trim them back by one-third to encourage bushier growth. Hydrangeas bloom on new wood, so aggressive pruning now won’t sacrifice next year’s flowers. Just be sure to sterilize your pruners with rubbing alcohol between cuts to prevent disease spread.
💧 Step 3: Feed and Hydrate for Spring Growth
After pruning, hydrangeas need a balanced fertilizer to fuel new growth. I use a 10-10-10 formula in early spring, following the package instructions for dosage. For blue blooms, add aluminum sulfate (1 tablespoon per gallon of water) every 4-6 weeks—this adjusts soil pH to 5.2-5.5, which hydrangeas crave for vibrant color.
Water deeply once a week during dry spells, ensuring the soil stays moist but not soggy. Hydrangeas have shallow roots, so mulch around the base with 2-3 inches of organic mulch (like shredded bark) to retain moisture and protect roots from temperature swings. Avoid piling mulch against the stem—keep it 2 inches away to prevent rot.
✂️ Step 4: Monitor and Adjust for Peak Blooms
By late May, you should see new leaves and flower buds forming. If growth stalls, your plant may need more phosphorus (the middle number in fertilizer ratios). Switch to a 5-10-5 formula to encourage blooming. Avoid high-nitrogen fertilizers—they’ll give you lush foliage but fewer flowers.
Watch for yellowing leaves, which could signal overwatering, underwatering, or nutrient deficiencies. If leaves curl or drop, move the plant to a slightly shadier spot—hydrangeas prefer morning sun and afternoon shade, especially in hot climates. Deadhead spent blooms in early summer to redirect energy into new flowers.
🌱 Step 5: Prepare for Winter Survival
To ensure next year’s blooms, start late summer prep in August. Reduce watering slightly to harden off the plant before winter. Apply a 3-inch layer of mulch around the base to insulate roots. For extreme climates (below 0°F), wrap the plant in burlap or use a frost blanket to protect against freeze-thaw cycles.
I also like to prune lightly in early fall—just enough to remove any weak or crossing branches. This keeps the plant’s energy focused on root development over winter. By October, hydrangeas should be dormant and well-mulched, ready to push out fresh growth when spring arrives.
Tips & tricks for reviving hydrangea blooms after winter
These cold-hardy strategies will help you coax vibrant purple blooms back to life—no matter how brutal the winter.
Timing is Everything: The mid-April timing in Step 1 is critical because that's when daytime temperatures consistently hit 50°F, signaling the plant to wake up from dormancy. If you inspect too early, you might miss those tiny green buds hiding under last year's dead foliage. I've seen hydrangeas push out growth as early as late March in mild climates, but wait until you're confident about those 50°F days to avoid false hope.
Pruning Precision: In Step 2, when cutting back brown stems to the ground, resist the urge to trim too close to the base—leave about 1/4 inch of stem attached. This small stub helps protect the plant from disease while still allowing new growth to emerge. For those leafless but still-green stems, that one-third trim creates the perfect balance between air circulation and energy conservation for next year's blooms. Sterilizing your pruners between cuts is non-negotiable—hydrangeas are prone to bacterial infections, and you don't want to introduce problems while trying to solve them.
Soil Science: The 5.2-5.5 pH range mentioned for blue blooms in Step 3 is where hydrangeas truly shine. To test your soil's pH, grab a kit from your local garden center—it's cheaper than you think. If your soil tests higher, aluminum sulfate is your secret weapon, but apply it gradually. I've seen gardeners overdo it and end up with yellowing leaves from aluminum toxicity. Start with 1 tablespoon per gallon every 6 weeks and monitor your plant's response closely.
Winter Prep Strategy: That 3-inch mulch layer in Step 5 isn't just insulation—it's a moisture barrier too. In early spring, you'll notice how quickly the mulch breaks down, which is why we recommend adding fresh mulch in late summer. For extreme climates below 0°F, consider wrapping the entire plant in burlap rather than just the roots. The extra protection prevents the dramatic temperature swings that cause root damage, which is often what kills hydrangeas between winters.
Pro Tips for Will My Hydrangea Bloom Again
- These cold-hardy strategies will help you coax vibrant purple blooms back to life—no matter how brutal the winter.
- Timing is Everything: The mid-April timing in Step 1 is critical because that's when daytime temperatures consistently hit 50°F, signaling the plant to wake up from dormancy.
- Pruning Precision: In Step 2, when cutting back brown stems to the ground, resist the urge to trim too close to the base—leave about 1/4 inch of stem attached.
Frequently asked questions
about hydrangea blooms—because even the hardiest plants need a little TLC! Here are answers to the most common concerns from gardeners just like you.Why did my hydrangea stop blooming this year?
Hydrangeas may skip blooms due to late spring pruning (cutting back old wood after buds form), nutrient deficiencies (especially nitrogen or phosphorus), or stress from extreme heat/drought. Check your pruning timing—most varieties bloom on old wood (last year’s growth), so avoid trimming until after flowering.
Can frost or cold weather kill my hydrangea for good?
Most hydrangeas are cold-hardy (zones 4–9), but severe, prolonged freezes (below 0°F) can damage roots or buds. If your plant looks brown and crispy after winter, wait until late spring to prune dead stems—new growth may still emerge from the base. Mulch heavily in fall for protection!
How do I know if my hydrangea is dead or just dormant?
Test for life by scratching the bark near the base—if it’s green underneath, the plant’s alive! For stubborn cases, dig up a small section of root (gently!) and check for moist, firm tissue. If roots are mushy or black, it’s likely dead. Patience is key—hydrangeas can take 2–4 weeks to show signs of recovery.
What can I do to encourage blooms next year?
- Feed in early spring with a balanced fertilizer (10-10-10) or one high in phosphorus (for blooms).
- Water deeply 1–2 times per week (hydrangeas hate drought!).
- Prune correctly: For old wood types (like macrophylla), trim only dead or overcrowded stems after blooming. For new wood types (like panicle), prune in late winter.
- Adjust soil pH: Blue blooms love acidic soil (pH 5.0–5.5); pink blooms prefer neutral (pH 6.0–7.0). Test kits make this easy!
Should I replace my non-blooming hydrangea?
Not yet! Before giving up, try rejuvenation pruning: Cut all stems back to 6–12 inches in early spring (risky but can spur new growth). If the plant revives, it’s worth saving. If not, consider propagating cuttings or swapping varieties—some hydrangeas (like oakleaf) are more forgiving.
Pro tip: Snap a photo of your hydrangea’s leaf shape, stem color, and bloom type before pruning—it helps identify the variety and pruning needs!
Wrapping up and next steps
Don’t let a little frost or uncertainty dim your hydrangea dreams!
With the right care—like choosing cold-hardy varieties, protecting roots, and pruning wisely—your blooms can return stronger than ever. Patience and consistency are your best tools, so keep an eye on your plant’s needs and celebrate each step of its revival.
Ready to give your hydrangea the love it deserves? Start by checking its soil moisture this week—a simple but powerful first move toward vibrant blooms next season! 🌸